.svg "bes-logo (1)")
Plastic parts like those used in almost every consumer product are often left bare—they pop out of the injection mold ...
Plastic parts like those used in almost every consumer product are often left bare—they pop out of the injection mold and are assembled into their final product. This is the most cost-effective means of producing injection-molded parts but restricts them to the color of the bulk material and textures of the mold itself. Bare parts like this can be pretty boring on their own, so manufacturers have developed a large number of ways to help give molded plastic parts some character.
Although in-mold decoration (IMD) and overmolding (or two-shot molding) are becoming ever more common, most design patterns and colored or metallic accents on plastic parts are added after the mold process. Some methods of enhancing a part’s style involve films, others rely on paint, some use powdered plastics, and others even use metallic vapors.
Below are some of the most common options we have to decorate and liven up a plastic part.
Paints Processes
Perhaps the simplest method of adding color or style to plastic is simply by spray-painting it. This is done with a liquid spray in a way very similar to how you would with a spray paint can in your driveway, but with more robots. Some paints are two-part and self-curing. Other plastic paints require a UV-curing step in exchange for enhanced durability.
Powdercoating is a relatively new process to the molded plastics scene. This process involves a powderized plastic that is sprayed (much like liquid paint) onto parts and then baked in place. Powdercoating was once reserved for metallic parts, like your bike frame, because most plastics will melt under the same temperatures required to cure a powdercoat. Additionally, getting a powder to electrostatically bond to plastic instead of metal before baking is a bit more difficult. The advent of new primary adhesion methods and UV-cured powder-paints has brought this robust coating to molded plastics relatively recently.
While the two paint processes above are great for applying a single color over an entire part, there are other painting methods that allow for applying designs or small areas of a part without the need for masking. The most well-known process is also one commonly used on t-shirts: silkscreening. As you might know, this method uses a thin plastic sheet that is placed over each part. The sheet has a mesh (or screen) area where we want to paint the part. The screen is placed over the part, paint is squeegeed across the mesh, and the screen is removed, leaving a thin layer of paint (as thick as the plastic sheet). This process can be repeated multiple times in the same area with different paint colors.
Pad-printing is one of my favorite ways to paint a plastic product. To get paint quickly and accurately applied to plastic parts, pad-printing is one of the cheaper methods. To understand this process, imagine a large rubber stamp (called the pad or tampon) that picks up ink from a printing surface, just like a stamp, and then presses it onto the part. Much like a stamp, the ink or paint picked up by the pad must be a mirror image of the actual design or text, as shown in figure 1.
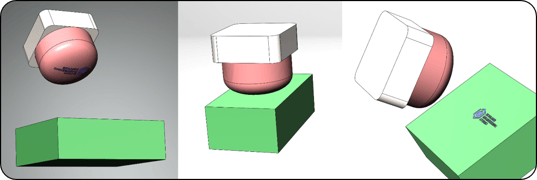
Figure 1. From left to right, a rubber pad/tampon (shown in pink) picks up ink as it is released from the pores in a metal surface. The ink is then pressed onto the plastic part (shown in green), which may be flat or curved in profile. The part is then removed for drying or curing.
Film Processes
These methods employ the application of thin films or adhesives to plastic parts. The most common version of this is your everyday sticker. Though simplistic, stickers have the benefit of being applied at the assembly house or by the final customer, thus saving in assembly time. These can be die-cut to almost any shape and come in a wide range of materials, textures and appearances—anything from faux leather to holograms can be made into a sticker. Of course, more basic labels for “reset” or “power” buttons can also be printed on a typical vinyl backing.
Other film processes quickly become more expensive but also more durable and conformable to different part shapes. One process is more commonly used for large, low volume plastic parts (like those for automobiles and motorcycles). Hydrographics, or immersion printing, is performed by placing a thin layer of paint onto a vat of water. The ink is less dense than water, so it floats on top of the liquid. After being primed, the plastic part is dipped into the tank and submerged into the floating ink. Like wet clothing, the ink clings to the plastic and envelops the part. To enhance durability, a clear coat of paint is applied afterwards.
OMD, or out-of-mold decoration, is the more exotic film application that I’ll list here. Much like in-mold-decoration, this process involves a thin piece of plastic (like a polycarbonate transparency) that can be textured or printed with a pattern or design. This sheet can either be vacuum-formed on its own and then adhered to the part or vacuum-formed around the part itself and then trimmed.
Metal Plating Processes
Particularly common in the automotive industry, metal plating on plastics is the way of getting a part that looks, feels, and weathers like a completely metal piece, but is usually much lighter and more affordable. Performed in an aqueous bath, electroless metal plating allows us to cover plastic with a thin layer of copper, nickel, tin, or gold. Electroplating can then expand that selection to other metal finishes, including chrome.*
Another process for metalizing plastic parts is commonly called PVD for physical vapor deposition. This process involves suspending a plastic piece in a cloud of vaporized metal. In the case of flashlight reflectors, PVD is used to give the surface mirror-like reflectivity. With certain pieces of electronics, plating can give plastic beneficial shielding properties. A plastic case coated with copper can prevent the emission of some electromagnetic waves that would otherwise interfere with other electronics, which is frowned upon by the FCC.
*Note: we do not typically recommend chrome coatings—they can be expensive and the process is often far from environmentally friendly.
Digital Printing Processes
There are several means of getting digital artwork (like your favorite cartoon character) onto an injection-molded part. I’ve already mention IMD and OMD, which use thin plastic transparencies that can be printed with a custom design before being applied to a plastic part. The IMD or OMD is bonded to the plastic and thus protects the artwork with a layer of plastic. An alternate approach uses sublimation printing much like that done for apparel. A thin layer of dye is printed onto transfer paper which is then placed onto the plastic’s surface. With a heat press, the dye is transferred and thermally bonded to the plastic substrate. This process is often seen on the flat sides of custom cell phone covers, allowing a manufacturer to put pictures of your dog (if that’s your thing) onto pre-fabricated plastic.
Lasers!
In many manufacturing facilities, lasers get involved somewhere. Whether it’s measuring, locating, or marking a part, plastics manufacture is no different. Low power etching lasers can be used to mark bare plastics with an engraved serial number or logo in the same way that they are used on metals and other substrates. Lasers can also be used to remove paint or ink that has already been applied to a part. For one client, we’ve had a clear part manufactured and then coated with a black paint. “MODE” was laser etched into the paint and gave us a button that could be lit from behind, illuminating the text!
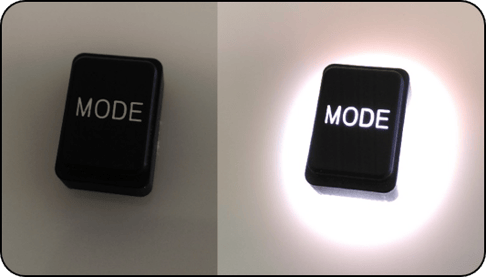
Figure 2. A small part designed by BES to have rear-illuminated text. This is achieved with a clear plastic body and laser-etched black paint.
Summary
When it comes to decorating parts, there is a large host of options available to the designer. Besides making a part look pretty, remember that finishing a part can help enhance its functionality. A good finish might increase durability, make the user experience more pleasant, or even allow consumer electronics to pass FCC testing! The most affordable and simple finish, however, will always be that which can be achieved right out of the mold: simple bulk plastic colors and in-mold textures. By assembling parts of different colors, we can do away with post-mold processes and still achieve striking contrasts in plastic parts, as shown in Figure 3.
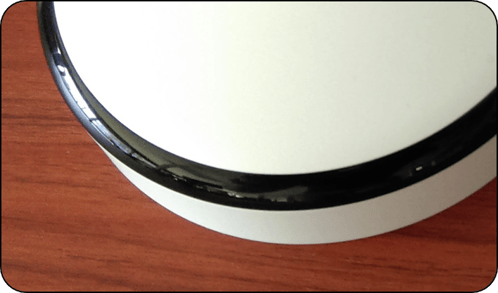
Figure 3. This injection molded part is assembled from two separate bare plastic pieces. The small additional assembly time is offset by removing the need for post-mold paint or another decorating process.
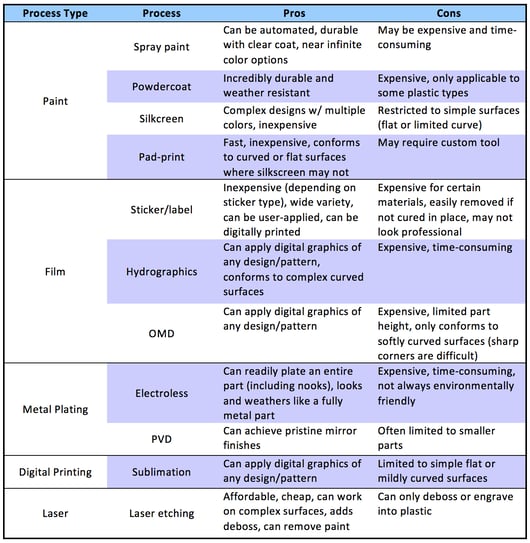
Table 1. Summary of common plastic decorating processes.